This post is going to tackle some basics of unit testing Angular 1.x applications usings Karma and Jasmine. Very recently I started working on parts of a commercial project which also includes a more complex front end which includes the test approach I am going to be writing about.
I’ve had never done any front end unit testing before at the current workplace and project so this is quite new and I am just starting to get acquainted with the entire ecosystem.
So as with everything new it is always fun to figure out and research how things work and what is what and how to best organize the work and the tests to better serve the architecture we are using.
We’ve used, quite heavily, a bespoke BDD framework approach to unit testing at the back end heavy module on a previous project and now having this option on the front end is going to really provide some additional value to the delivered code.
First thing first!
Small update on the blog! It has been migrated from using jekyll 2.x to 3.x. With this I’ve also updated the syntax highlighting to Rogue which in my opinion is much nicer and cleaner and includes line numbers!
Secondly, I haven’t have had the time to write lately and I still am to finish the second and future parts of the Javascript Polygon Game Engine series. I’ll be skipping it for now even though the draft for the second part is under development. I’m going to try and rebuild some momentum with some other posts more related to what I am working on at the moment at work and privately before going back to it.
With that out of the way let’s get back to the topic!
Karma? Jasmine? Mocha?

Very shortly let us go over the several key concepts involved in the testing approach.
Jasmine
Jasmine is the core library that provides the testing functionality. It sort of combines both a framework for describing tests for code and running assertions as well as code for mocking and stubbing services and functionality via the spying concept.
But Jasmine is a bit different than your regular unit testing framework like nUnit. It describes itself to be a behaviour driven development framework. The difference is most notable in the way the tests are written and the components and their functionality are described.
With Jasmine you get very neatly organized and if you want, natural language test output. This is very neat especially if you combine the output via Karma with some interesting reporters integrated into your CI solution.
Read more about Jasmine and all the different features it provides here!
So what is Karma?
Karma is the infrastructure on which Jasmine operates. Or more specifically Jasmine is just one of many frameworks that can be used in Karma. And Karma is the actual utility that is running and bootstrapping a browser window and executing the tests written with Jasmine.
We write the tests with Jasmine and Karma runs them and outputs the results in many different ways.
It is very extensible and modular with a lot of different plugins and reporters as well as the capability for starting up all the different browsers and running the tests inside the actual browser (specific JS engine).
Karma is a tool that as we said, can create a server, load files/source code, and then execute tests (written in Jasmine in our case) against that code.
You can read more about Karma here!
With that said in the next section we will take a look at configuring Karma for our test needs.
Configuring Karma
I will not go into the details of installing the frameworks and tools. They are installed and setup using npm and the packages and installation instructions can be found on the respective sites mentioned above.
Karma is configured in the most basic way with a karma.config.js file. There are a lot of examples online of the most basic file, and we will look at one right now:
// Karma configuration
module.exports = function(config) {
  config.set({

    // frameworks to use
    // available frameworks: https://npmjs.org/browse/keyword/karma-adapter
    frameworks: ['jasmine'],


    // list of files / patterns to load in the browser
    files: [
      'bower_components/angular/angular.min.js',
      'bower_components/angular-mocks/angular-mocks.js',

      'src/app/**/*.js',
      'src/app/**/*.spec.js',
    ],

    plugins: [
      'karma-jasmine',
      'karma-mocha-reporter',
      "karma-chrome-launcher"
    ],

    // test results reporter to use
    // possible values: 'dots', 'progress'
    // available reporters: https://npmjs.org/browse/keyword/karma-reporter
    reporters: ["mocha"],

    // start these browsers
    // available browser launchers: https://npmjs.org/browse/keyword/karma-launcher
    browsers: ['Chrome'],

    // enable / disable colors in the output (reporters and logs)
    colors: true,

    // Continuous Integration mode
    // if true, Karma captures browsers, runs the tests and exits
    singleRun: true
    })
}
The most notable first configuration parameter is the framework that Karma will use to run tests. Here we see that Jasmine is the framework configured.
Secondly we can see the list of files that will be loaded in the browser when Karma starts and instantiates a browser instance.
The important thing about the files is that they should include all the code that will be tested and all its dependencies including any mocking libraries.
In the small example we see that we include the base angular script as well as the angular mocks module which mocking functionality which is very briefly explained in the actual test example but will be talked about a bit more in following posts.
From there we see that we then just include our own code using wildcard folder selection. One thing to note is that we are not including the app.module.js file because basically there is nothing to test there. But we will see that we still have to define the module in the tests.
  // frameworks to use
  // available frameworks: https://npmjs.org/browse/keyword/karma-adapter
  frameworks: ['jasmine'],

  // list of files / patterns to load in the browser
  files: [
    'bower_components/angular/angular.min.js',
    'bower_components/angular-mocks/angular-mocks.js',

    'src/app/**/*.js',
    'src/app/**/*.spec.js',
  ]
Plugins, Reporters and Browsers
The next step in the configuration is defining the plugins for the test framework used (Jasmine) and the reporter used to show the test results, which in our case is Mocha. We’ve also configured chrome as the browser where the source code will be loaded and tests executed:
// Used plugins
plugins: [
  "karma-jasmine",
  "karma-mocha-reporter",
  "karma-chrome-launcher"
]

// test results reporter to use
// possible values: 'dots', 'progress'
// available reporters: https://npmjs.org/browse/keyword/karma-reporter
reporters: ["mocha"]

// start these browsers
// available browser launchers: https://npmjs.org/browse/keyword/karma-launcher
browsers: ['chrome']
The 3 configured plugins tell Karma the following:
- karma-jasmine is used to tell/link Karma, the test runner, that Jasmine is the test framework
- Remember that karma can use different test frameworks beside Jasmine
- With the plugin we are basically creating the link between Karma and Jasmine
- There are many such plugins so that Karma can utilize the different test frameworks
- It is going to use Mocha as the reporter.
- The tests results are going to be displayed using the Mocha reporter
- We can put a bunch of reporters in the reporters array and we would need plugins for each of those
- There are reporters that generate output that can be used in other tools, like the teamcity reporter for integrating with TeamCity CI
- It will execute the tests in Chrome - using chrome’s javascript engine.
- Again we can specify multiple browsers and will need plugins for those.
- It will actually open up a Chrome window
- We can even use a headless browser. No window open and everything gets executed in memory in a way, which is useful for integrating with CI.
The Application we are testing
We are going to be using an extremely simple example angular application for showing off the initial test code. It consists of a simple module definition and a single controller.
The applications has one button which on ng-click calls a function called greetUser which sets a scope variable to “Hello User”.
The entire setup is very simple and we are not even utilizing any routing to start. There is only the one single controller and it is declared on the HTML using ng-controller=”HomepageController as vm”
The important bits in the index.html file:
<body ng-app="app">
  <div class="container">
      <div class="row">
          <div class="col-xs-12 col-sm-12 col-md-12 col-lg-12">
              <div ng-controller="HomepageController as vm">
                  <div class="row">
                      <div class="col-xs-12 col-sm-12 col-md-12 col-lg-12">
                          <button data-ng-click="vm.greetUser()" type="button" class="btn btn-large btn-block btn-primary">Greet Me!</button>
                      </div>
                  </div>
                  <h1>

                  </h1>
              </div>
          </div>
      </div>
  </div>
</body>
The controller is very simple as well with just that one single message and event handler:
(function(angular){
    angular.module("app")
        .controller("HomepageController", homepageController);

function homepageController(){
    var vm = this;

    vm.greeting = "";
    vm.greetUser = _greetUser

    function _greetUser(){
        vm.greeting= "Hello User";
    }
}
})(angular);
In this first introductory post the only thing we will be testing is the greetUser functionality of the controller. We are expecting the correct message to be set on the controller vm property when the button on the page is clicked.
We will not be checking if the html page actually has rendered a button that has been wired up with ng-click, so in a way we are just testing the greetUser (and indirectly the _greetUser) method.
Let’s now take a look at the actual test!
The test code with Jasmine
This simple test is located in a file that shares/follows a naming conventino based on the code under test. As we are testing the homepage.controller.js code we have a single file called homepage.controller.spec.js file which is something I believe taken from BDD. This file defines the specification (.spec) for the controller:
describe('On the homepage', function() {
    beforeEach(module("app"));

    var $controller;

    beforeEach(inject(function(_$controller_){
        $controller = _$controller_;
    }));

    describe('When clicking the greet me button', function() {
        it("A 'Hello User' message is displayed to the user", function() {
            // ARANGE
            var controller = $controller("HomepageController");

            // ACT
            controller.greetUser();

            // ASSERT
            expect(controller.greeting).toBe("Hello User")
        });
    });
});
The first thing we notice is the describe method, with a string as a first parameter and a function which contains the rest of the code. Describe does exactly that! It describes a feature or a module and or the functionality under test.
With the first call we are describing the homepage and what the user can do on that page. We can see that we can use a more natural language when describing the features.
One thing to mention is that the test we wrote here is actually testing the homepage.controller, but we’ve opted out to describe the feature the controller is bound to instead of the actual controller. An alternative describe call that would make sense possibly would be describing the controller. We will take a look at an example after we cover the rest of the test.
Bootstraping Angular
Because we are using Jasmine to test angular we must bootstrap and make some initial calls.
beforeEach(module("app"));
The first call sets up a mocked [app] module. This the module under which the controller under test is defined in and the same module used in the ng-app directive in the HTML. If we go back and look at the karma.config.js file we can see that the app.module file is not included.
Even if we did include it we would have still needed to call the mock module initialization.
We setup the app module using a beforeEach function which executes code before each test in the suite.
One important thing to remember is that there is a closure hierarchy between describe, beforeEach and the it Jasmine functions. Let us just say that there is an inheritance structure that we will explore a bit more in following posts.
Angular mocks and controller instantiation
Now we need to get access to the controller we are testing.
Because we are testing angular controllers we can not exactly just create the controller on our own. We will be using the $controller service provided by angular to create the homepage controller, so naturally we need to get a hold of that service and store it locally to instantiate the controller for each test. This is useful if we wanted to also test controller initialization logic.
To get access to the $controller service we need to take an approach similar to writing regular Angular code, where we would get the service injected in a function by the framework.
This means we would need to define a function that takes the $controller parameter and stores it in a variable defined in a “higher” javascript closure, making it accessible to the rest of the code.
So we can have a function like:
function($controller){
    localControllerServiceReference = $controller;
}
But we would still need to call it and inject $controller somehow because when the tests execute there is no angular framework to parse ng-app and do the bootstrapping.
This is where the angular-mocks module and inject come in. We can see that in the karma.config.js file we specified, besides the core Angular file, the angular-mocks file.
Passing the above mentioned function as a parameter into an inject function, will make sure that the angular-mocks calls it and provides any required services.
We of course will be doing this in a beforeEach method so it is done for each test.
The only thing to mention here, which is an implementation detail of angular- mocks is the naming convention for the function with pass into inject. If we want our localControllerServiceReference to instead be called $controller$ we need to differentiate between the local *$controller reference and the parameter in the function we pass into inject.
We do this by adding leading and trailing underscores ‘_’, which inject will know to parse and remove so it can figure out what exactly we are requesting.
So the final piece of code will look like this:
// this is the local $controller service reference
var $controller;

beforeEach(inject(function(_$controller_){
    $controller = _$controller_;
}));
Acting and asserting - the ‘it’ block
At this point we have everything setup and we can continue writing the test for our feature/functionality.
We are going to use another describe which isolates a specific part of the homepage functionality we want to test. That is the clicking of the greetme button (triggering the greetUser method ) and the expected outcomes out of that action.
In this describe scope we define the “final specification”. We say that the “Hello User” message will be displayed on clicking the button.
We do this with the it method, which I’ve written to follow the AAA (ARRANGE/ACT/ASSERT) approach to writing a test.
describe('When clicking the greet me button', function() {
  it("A 'Hello User' message is displayed to the user", function() {
      // ARANGE
      var controller = $controller("HomepageController");

      // ACT
      controller.greetUser();

      // ASSERT
      expect(controller.greeting).toBe("Hello User")
  });
});
So, once we execute greetUser we expect that the greeting property on the controller will be set to “Hello User”.
This is asserted by calling the Jasmine expect function which offers a nice fluid API for describing the expected outcomes of the actions and values on properties.
We will take a more detailed look at the expect method in some of the following posts.
Running the tests and looking at the result.
So we have wrapped up the test code of this very simple controller test.
We can run the test using karma start from the command line in the project folder with our karma.config.js file.
The output of the test using the mocha reporter will look like this:
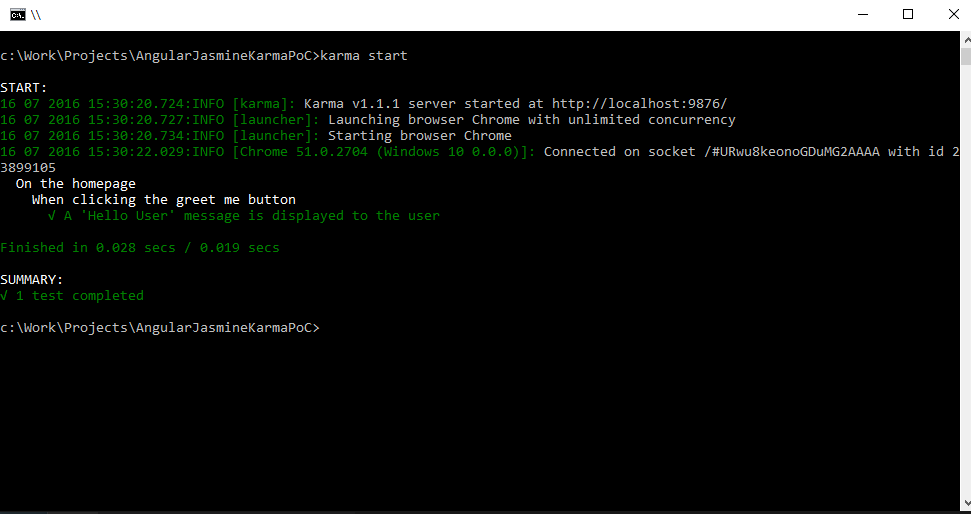
We can see how the mocha reporter organized the describe statements and the it statement in a nice hierarchical flow. Using the natural language we were even able to describe that one behaviour on the homepage.
This is a very cool approach if you consider that we can use different reporters and output this to different external tools like TeamCity or even a tool that generates documentation that can serve as a specification of the features of the system.
Alternative describe aproach.
I mentioned previously about an alternative test approach focusing more on the controller. Now we’ve seen the output of the test execution so we can more easily see that the alternative approach could be something along the lines of:
- The homepage.controller
- Contains a greetUser function
- Which when clicked sets the greeting to “Hello User”
- Contains a greetUser function
This is just one example of a different way to describe the functionality we are testing.
A note on test organization.
Like with everything there are some different approaches in organizing the test structure and the describes. For the current example I started by thinking about what the top describe should tell someone who is reading the tests. This being a suite for the homepage controller I wanted to start with describing the homepage.
The next describe is about the particular action someone can take on the homepage. Then finally the it method describes the expected outcome.
At this point, honestly, I am not very sure that this is a prefered or an optimal approach. This might get reviewed as this series of posts continues and I add more tests and features to the simple app.
Any comments regarding this are of course more than welcome.
Failing test
Just as an example we can see a test output of the test failing. If I change the specification to the following:
describe('When clicking the greet me button', function() {
  it("A 'Hello User' message is displayed to the user", function() {
      // ARANGE
      var controller = $controller("HomepageController");

      // ACT
      controller.greetUser();

      // ASSERT
      expect(controller.greeting).toBe("Hello there stranger!")
  });
});
we can see that the test output shows an appropriate error message letting us know that a test is failing and giving us some details about the reason:
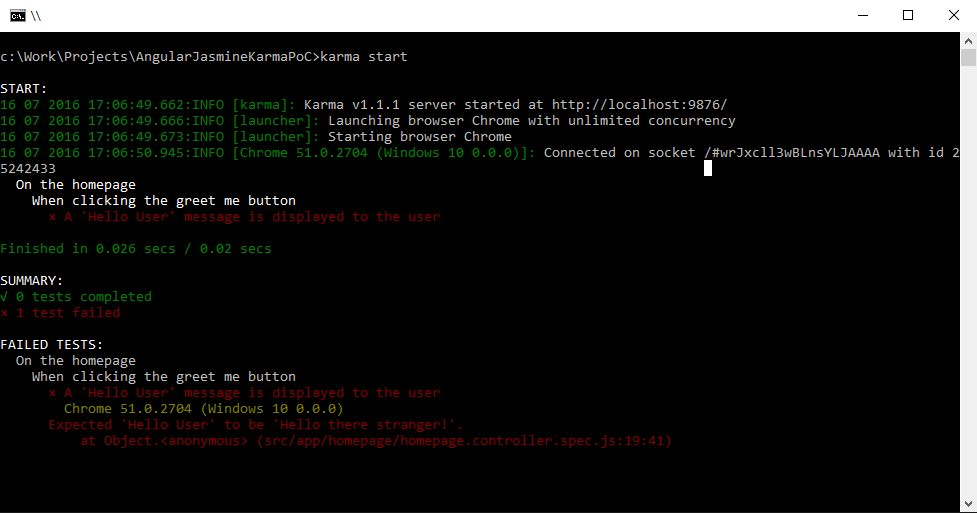
Again the output depends and can be different based on the used reporter.
What is next?
The goal with the testing posts is to try and develop a simple application or even a simple text based game using the TDD approach using these tools. For now I have some ideas where to go from here, mainly on reaching the point of test complexity I’ve reached on the project at work.
This is going to include some mocking and injecting services using $provide and possibly, depending on the test application here, a different approach to organizing and instantiating the code under test.
In closing
Currently, I personally am fascinated by Jasmine and the whole testing approach. We have been using it at work integrated with our CI system (TeamCity) and it has been great so far.
It’s quite useful to have front-end build and test output on each commit and already have caught some bad PRs which we would have probably failed catching without the support of Karma/Jasmine :)
Either way, I hope someone finds this useful. The code for the test project can be found here! When cloning you should restore both bower and npm packages to get everything working!