This is going to be a short one! Still in the middle of a bunch of other smaller projects and this came up as a possibility and I wanted to keep up the momentum of writing something!
So, I recently started looking at some old projects and repositories and ran into the second and last ever game I’we worked on.
I also found what I consider the first, which is a Microsoft XNA educational game on the solar system but I can’t actually run it at the moment on the account of XNA being basically deprecated and not usable on newer OSes.
There is a way, using MONO, but that sounds like a job for another time!
This second one though! It’s JAVASCRIPT! It’s from 2013 and it still works! Mostly….
So I downloaded it and fired it up and I thought I’d would be fun to take a look at that code and see how things have generally changed in the last 5ish years.
Game Time!
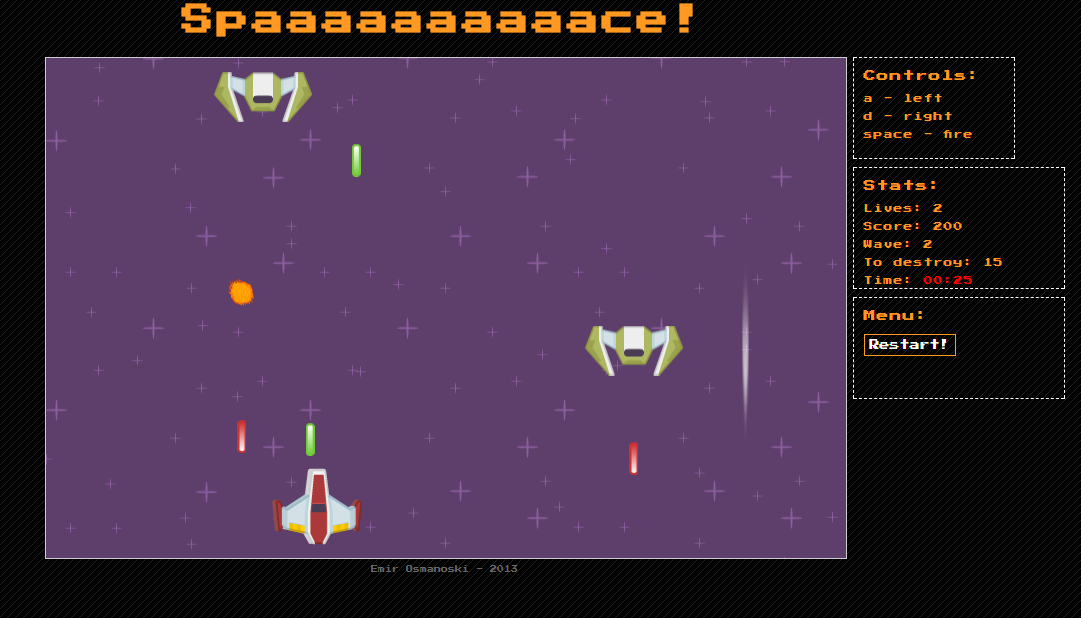
Before going any further the game is actually available here:
PLAY!
The inspiration and the game design
I remember that the actual inspiration of doing the little hobby project came from a post I ran into at this subreddit. It was someone publishing a small set of game assets for a 2d space type of game. Combining that with my interest in JavaScript resulted in me spending some free time over the next period working on it and the result became what we are looking at here.
For the purposes of this post I looked up the assets and they are still available and actually have been expanded from what I remember was initially published years back.
If anyone is interested they can find the updated collection here.
The Design! A Blast from the past!
The design of the game is very simple. You are a little spaceship and have waves of enemies coming at you at the top and you can only move horizontally. When I was a kid I’ve played tons of games using the similar approach and this was my attempt at a very simplified version of that!
After killing enough enemies you advance to the next wave which increases the difficulty of the game by:
- Spawning enemies faster
- Making enemies and projectiles faster.
- Increasing the number of required enemy ships destroyed to advance to the next level!
You get 3 lives and after being hit by either an enemy or projectile you loose one and gain an invulnerability shield for a couple of seconds.
When you run out of lives you are shown a Game Over Screen with your score, the enemy wave you reached and the time it took you to get there.
Let’s talk code!
KISS! Keep it simple and stupid! And this little project delivers on that!
At the time I wanted to learn a bit more about JavaScript so the game is implemented without any frameworks (except jQuery!) using the basic Canvas API, with jQuery as a support for implementing the simple game UI.
So without any further delay:
The Code
Note: The plan was always to openly publish the project and maybe have someone else use some parts of for educational purposes or even to build something else on top of it.
The code is heavily commented. I did that both for my own sake, as a way to verify/document the concepts and functionalities, and to make it easier for someone else to pick it up!
Over the years I’ve come to think of commenting as a little pitfall. They are bunch of better ways to make code understandable which don’t rely on comments. One of which is the code itself following stricter code quality patterns.
So let’s just take a glimpse at some of the more core aspects and how things tie in together.
We will also look at some infrastructural issues and challenges faced at the time like managing dependencies and “building” the code.
The Game Loop!
The magical game loop! Take User Input! Update State! Check State Conditions! DRAW!!
The main game file which handles all that (among other things) is of course main.js. It’s the “App Root” and in a way contains all the calls to all the other modules.
Let’s take a look at two functions in the main.js module. The Start game and the Game Loop
/*
	Called once all the assets are loaded.
	Hides the asset loading overlay and starts
	the initialization of major game modules.

*/

function startGame(){
	// Remove the "loading screen"
	$("#main-loading").hide();

	// Initialize dom ui
	g.domui.initDomUI(resetGame);

	// Start the background music
	// g.assets.backgroundMusic.loop().play().fadeIn();

	// Initialize the
	g.background.setupBackground();

	// Fully reset the game state
	resetGame();

	// Init the enemy spawner
	g.spawner.start();

	// Init the doodad spawner
	g.doodadspawner.start();

	// Setup the delta time functionality which is
	// covered in the main game loop
	g.last = new Date().getTime(),
	g.dt = 0;

	// Start the game loop
	gameLoop();
};

function gameLoop(){

	requestAnimFrame(gameLoop);


	// update delta time
	var now = new Date().getTime();
	g.dt = now - g.last;
	g.last = now;

	if(g.dt > 1000){
		g.dt = 1;
	}

	// clear the screen
	g.draw.Clear(g.ctx);

	// if the game is not over
	if(!g.state.isGameOver()){
		// Make the update call
		updateCall();

		// make the draw call
		drawCall();
	}
	else{
		if(g.state.getState() != g.state.gameStates.GameOverDisplayed){
			g.domui.showGameOverOverlay(
				g.state.getPlayerScore(),
				g.state.getCurrentWave(),
				g.state.getTimeElapsed());

			g.state.setState(g.state.gameStates.GameOverDisplayed);
		}
	}
};
Looking at “startGame” we can see that it initializes a lot of other modules that handle a collection of different things while the game is running. All of these submodules are then given a chance to do some processing in the game loop when the updateCall method is called.
But where is the loop?! And what’s all this time dt(delta time)? One of the bigger lessons in Canvas game development is managing how often the game loop actually get’s called.
One way to do that is of course with the setInterval JavaScript functionality, but that does not guarantee that all the drawing operations and the browser will be ready to process the code when the timeout is called.
A much better way as we can see above is the method call to requestAnimFrame and passing the game loop method! The requestAnimFrame above is a wrapper over the actual method (browser dependent) requestAnimationFrame
The implementation of the wrapper:
window.requestAnimFrame = (function(){
      return  window.requestAnimationFrame       ||
              window.webkitRequestAnimationFrame ||
              window.mozRequestAnimationFrame    ||
              window.oRequestAnimationFrame      ||
              window.msRequestAnimationFrame     ||
              function( callback ){
                window.setTimeout(callback, 1000 / 60);
              };
})();
The wrapper (new global function) is just making sure to call the right (vendor) version of the method. It also makes sure to fall back to a ~60fps timeout call if no version of the requestAnimationFrame method is present.
You can read more about requestAnimationFrame here.
Delta Time
The time and delta time calculations are actually used as a factor in any updates that involve movement and animating things on the screen.
It comes down to the issue of us not knowing how much exactly time has passed since the last time we ran updates so we might need to increase/decrease the amount of space we move things to keep everything smoothly animated.
We notice that we set the Delta Time on the “Global” g/game variable so its available in all the modules. We will take a quick look at how delta time is used in one of the following sections.
The Update and Draw Methods
Very briefly taking a look at the update and draw methods and look into some specific code around that.
/*
	The main update call. Calls the update methods
	on all the dependent and major modules of the game.
*/

function updateCall(){
	// call the background module update
	g.background.update();

	// update the enemy spawner
	g.spawner.update();

	// update the doodad spawner
	g.doodadspawner.update();

	// call the players update
	g.player.update();

	// call the update on the entity manager
	g.emanager.updateEntities();

	// update the particle system
	g.particle.update();

	g.state.update();
};

/*
	The main draw call. Calls the draw methods on
	all the dependend and major modules of the game.
*/

function drawCall() {
	// draw the background
	g.background.draw(g.ctx);

	// call the draw entities on the manager
	g.emanager.drawEntities(g.ctx);

	g.particle.draw(g.ctx);

	// draw the player
	g.player.draw(g.ctx);

	// draw the player
	g.state.draw(g.ctx);
};
Update and draw are pretty simple here. With each GameLoop Loop they call the update and draw calls of the appropriate modules.
For example we can see that here we have the update and draw methods being called for the player. Each draw call also gets the Canvas Context object from the global g/game variable which is the actual Canvas API used to draw stuff on the Canvas.
To wrap up this code part let’s take a look at the players update and draw methods. We will start with update:
/*
The update method is called from the main game loop
and allows the player entity to process what is going
on with the game and the input and update internal tracking
variables accordingly.

Its main use is to check for input on the game controls and
update player ship position and actions.

Update will also handle the visual blinking when the ship
cannot be hit by updating an internal drawPlayer variable
which is then used in the draw function to switch drawing
visibility.
*/

var update = function(){
	// Get key states and update player according to input
	var keyStates = g.input.keyState;

	var canvasWidth = g.canvas.width;

	if(keyStates["left"]){
		x -= speed * g.dt;
		activeImage = g.assets.playerLeft;

		// we need to determine if the
		// player went fully of screen to the
		// left side, and if so move him to appear
		//  on the right side of the screen.

		if(x <= 0 - width){
			// subtract the five so it becomes
			// more visible on the right side.
			x = canvasWidth - teleportMargin;
		}

	}
	else if(keyStates["right"]){
		x += speed * g.dt;
		activeImage = g.assets.playerRight;

		// same as when going to the left,
		//  we are checking if the player
		// moved out of the screen on the right side.
		if(x >= canvasWidth){
			x = (0 - width) + teleportMargin;
		}
	}
	else{
		// if we dont move
		activeImage = g.assets.player;
	}

	// If the fire binding was pressed
	// and released indicating a full key action.
	if(g.input.wasKeyFull("fire")){
		fireLaserSound();
		playerFireWeapon();
	}

	// Blinking section if the player cannot be hit
	if(!playerCanBeHit){

		g.domui.showPlayerLives(g.state.getPlayerLives());

		if(drawPlayer){
			setTimeout(function(){
				drawPlayer = false;
			}, 150)
		}
		else{
			setTimeout(function(){
				drawPlayer = true;
			}, 150)
		}
	}
	else{
		g.domui.hidePlayerLives();
		drawPlayer = true;
	}
};
The update method looks at the Input state (what the player has been doing with the keys) and updates the Player’s X coordinate. In our case the player is on a fixed Y position.
Here we can see the use of Delta Time. It is a factor taken into consideration when calculating the speed with which we will move the player in this update/draw loop. So if a lot of time has passed since the last time we reacted to player input to move, we will increase the movement/speed (and thus how much we move now) for the current update/draw loop
We also run some logic checks, like for example we handle the blinking by checking the state of the playerCanBeHit variable. While it is true we change the state of the drawPlayer variable which results in the player ship being drawn for a couple of frames and then being hidden for a couple of frames, thus resulting in a blinking animation.
After handling all our logic in update we can see that draw is fairly simple:
/*
The main player entity draw function that is reposinbie
for displaying the player ship sprite on the canvas
*/

var draw = function(ctx){

	if(drawPlayer){
		g.draw.DrawImage(ctx, activeImage, x, y);

		if(g.config.drawBoundingBoxes){
			g.draw.BoundingBox(ctx,getBoundingBox());
		}
	}
};
If the player is to be drawn we use a custom g.draw module to draw the player Active Image. The player can have 3 active images based on the current movement pattern. These 3 images are used to mimic tilting/animation when standing still, or moving left or right.
RMP
I remember at the time learning about polluting the global namespace in JavaScript and different ways to approach that problem. One of the ways to avoid it was using the Revealing Module Pattern.
So when looking at the code we can see it’s a collection of modules that add/create themselves under a single variable that lives in the global namespace: window.game
To ease the process of creating the modules I even added a file that was just that, a RMP template:
/*
	An attempt at implementing the javascript
	revealing module pattern for the major game components.

	Most of the components and javascript
	files are organized to follow this structure.
*/

(function(g){
	g.INSERT_MODULE_NAME_HERE = (function(){
		// ================= Inner constructor functions ============
		// ==========================================================

		// ======================== Properties =======================
		// ===========================================================

		// ======================== Public Functions =================
		// ===========================================================

		// ======================== Private Functions =================
		// ===========================================================

		// ======================== RMP ==============================
		// ===========================================================

		return {
		};

	})();
})(window.game = window.game || {});
By looking at the game loop we already saw that this is heavily used. Each method called in update/draw is called on one of these modules!
You can read more about RMP here!
The idea of re-use?!
There are a bunch of modules in the project that actually do a bunch of stuff not necessarily related to the space ship style game. I remember that at one point the idea was to move out certain parts and make them reusable for other types of 2d games.
So certain modules like particle.js try to do just that. It’s a very generic module that offers some classes that can be used to draw any sprite based “particles”. Basically given a sprite sheet depicting particles it is able to render the images for the given sprite in any location on the canvas.
There was a bunch of refactoring work left at the time to achieve that but nonetheless it was an idea that was facilitated by the RMP pattern.
Let’s now take a look at some of the “infrastructural” challenges!
Before going any further there is a ton of stuff not covered here! Even things in main.js are not shown, mainly loading of all the game assets! Leaving it up to the reader to further explore the repository. And if someone could submit a PR with a fix for the sound not working, that would be great!
Managing dependencies
What?! Are you crazy? Just download the jQuery version you need and slap it into the js folder. What is not clear there?
Obviously this is a far cry from today’s world of Bower (RIP), NPM, Yarn and so on and so forth! But for such a simple requirement, hey guess what! It worked!
Building the Game
One of the weirdest moments I had re-exploring the code base was the utilities sourceCompilation folder. It contains some sort of a compiler that takes all the modules and concatenates them in a single file. This compiled output can be found in the src folder. The compiler even ran a obfuscation over the variable names.
And what about the mechanism to replace the source files with the compiled output? Looking at the script references in default.html might give us an answer on how it was done:
<script type="text/javascript" src="js/jquery-1.8.3.min.js"></script>
<script type="text/javascript" src="js/soundjs-0.3.0.min.js"></script>
<script type="text/javascript" src="js/buzz.js"></script>
<script type="text/javascript" src="js/debug.js"></script>
<script type="text/javascript" src="js/loader.js"></script>
<script type="text/javascript" src="js/animation-api.js"></script>
<script type="text/javascript" src="js/draw.js"></script>
<script type="text/javascript" src="js/input.js"></script>
<script type="text/javascript" src="js/background.js"></script>
<script type="text/javascript" src="js/particle.js"></script>
<script type="text/javascript" src="js/emanager.js"></script>
<script type="text/javascript" src="js/projectile.js"></script>
<script type="text/javascript" src="js/doodad.js"></script>
<script type="text/javascript" src="js/enemy.js"></script>
<script type="text/javascript" src="js/spawner.js"></script>
<script type="text/javascript" src="js/doodadspawner.js"></script>
<script type="text/javascript" src="js/player.js"></script>

<script type="text/javascript" src="js/domui.js"></script>
<script type="text/javascript" src="js/state.js"></script>

<script type="text/javascript" src="js/configs.js"></script>

<!-- Should always be the last script added  as it starts the game -->
<script type="text/javascript" src="js/main.js"></script>

<!-- <script type="text/javascript" src="js/compiled_output.js"></script> -->
Yep just delete all the source file references and uncomment the compiled output! Once again, it was enough for 5 years ago! I also never deployed this thing anywhere that often that I needed anything more automatic!
Oh boy are things done differently today!
Lessons Learned
To start wrapping up the article I will look into some lessons learned from the project and the couple of key points I took away from it!
JavaScript
One thing the project impressed on me in a way is that JavaScript can be really fast! Thing is I’m not sure how true that is but apparently It’s capable of smoothly drawing a big amount of images on the screen at the same time, move them around, animate frames, and make a ton of calculations to parallax animate backgrounds.
It can process keyboard inputs and translate that to movement of said images, all at the same time, and all while maintaining a stable frame rate!
So if it turns out that if any of the applications I’m working on today (mostly Angular) are “slow” it means we are making some serious core mistakes somewhere. Taking and validating user input in forms should never be slower or less performant than flying spaceship around!
I also came out of it thinking that you can do anything with the language. That gave me a sense of “security” when tackling today’s more “boring” hard challenges of displaying data in this way or that way, or updating table cells based on dynamic differences in data or whatnot!
To summarize JavaScript was, still is and will probably continue to be my favorite language. And I think this project has a big role in that! And I can’t wait to see what the future looks like!
TypeScript, I’m looking at you! In this case it also turns out that I can’t wait to see what the past had to offer! Go easy on me, I had some crazy deadlines and different priorities with no wiggle room for new shiny TypeScript!
Tooling
This one gets me! Today I can’t image starting anything to do with JavaScript without having NPM/YARN and Gulp as support. They just offer so much in terms of quality of life and productivity! I mean LiveReload! Come on!
And yet 5 years ago apparently it did not matter. I had no problem hitting F5 each time code changes were made and it was enough to get this simple little game finished.
Also the compiler nonsense was enough for the rare occasions I needed to minimize the code.
At the end today it’s very simple to setup a simple build chain (GULP) I think its not worth not having it!
Summary
The year 2013 sure seems far away now and sure looks like a different time. I’m glad I had the drive and opportunity to take some time to work on something like this little game. I’m sure it was a welcome change of pace from the maybe mundane daily work tasks.
It was also an amazing learning experience with some deep and resounding lessons that follow me to this day.
But as is with most things, change is inevitable. The challenges and priorities of today are different. Today we have Angular and React and Vue.js and a bunch of other Front-End frameworks, tools and API’s to learn about and master.
But nonetheless it was fun to step back and take a look in the past, even for a short couple of days!
So, hopefully someone will find something here of use for their own journey! And for bonus points here is the code for two additional old hobby projects: (I’m never planning separate posts for these! One of these is enough!)
-
Static HTML Generator for a Bootstrap 3 Gallery
If you give the console app a folder structure with images it will generate HTML with Bootstrap with image tags and appropriate Bootstrap functionality for showing all images in a gallery.
-
Bulk Download Bing Images for a given Keyword
This is a strange one. I used it with the first repo to bulk download images and build custom galleries. Not sure why I used Bing though! I think their Image/Search API was more “open/understandable”, if you could believe it, from Google’s